
Vibe Coding Workflow:
How to Build Faster With AI
Most people treat vibe coding like a magic trick. Type a thing, get an app. And sometimes it does feel like that. But the builders who actually ship products consistently, not just demos, follow a workflow. It is not complicated, but it is intentional.
This post breaks down the full vibe coding workflow from raw idea to deployed product. Whether you are using Lovable, Cursor, Bolt, or v0, the underlying process is the same. Get this right and you will build faster, debug less, and stop starting over from scratch.

The Core Stages of a Vibe Coding Workflow
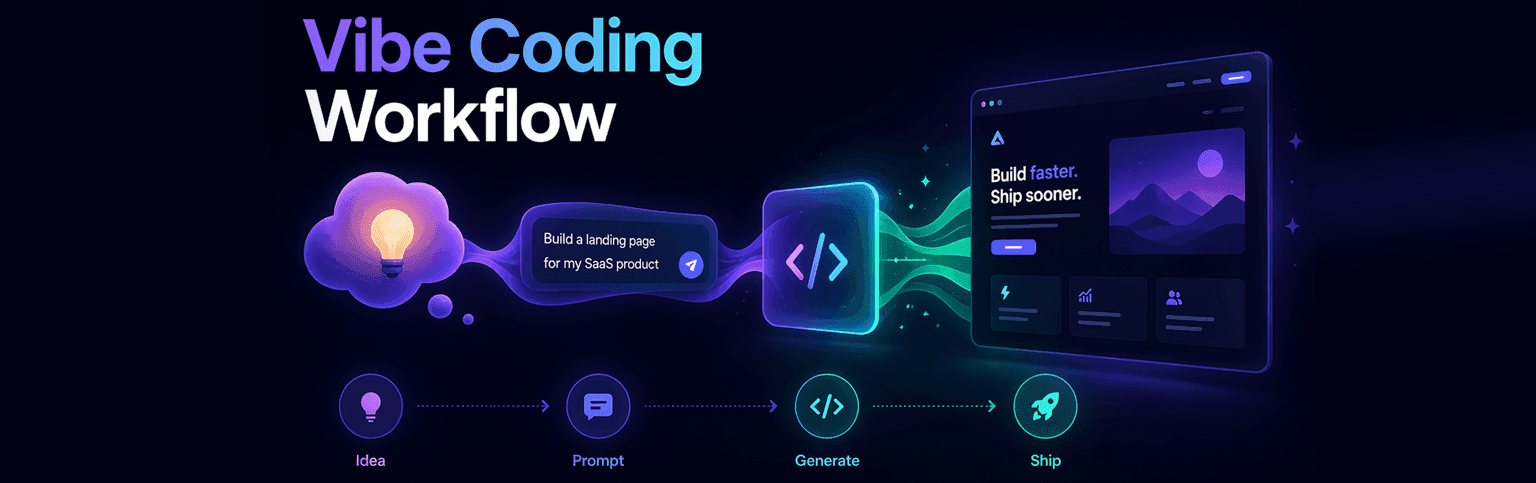
A solid vibe coding workflow has six stages. Each one feeds into the next. Skip one and you will feel it later — usually in the form of an AI that keeps generating the wrong thing or a codebase that gets messier with every iteration.
Here is the full loop:
1. Define the product clearly before you touch the AI
2. Translate your idea into structured prompts
3. Generate, review, and approve each build step
4. Iterate in small, focused cycles
5. Debug what breaks
6. Deploy and keep building
This is the ai development workflow that separates people who ship from people who tinker forever and never launch.
Turning Product Ideas Into AI Prompts
The biggest mistake beginners make is skipping this step. They jump straight into the tool, type a vague sentence, and then spend hours fighting the output. The AI is not the problem. The brief is the problem.
Before you open Lovable or Cursor, spend 15 minutes writing down exactly what you are building. Not the vision. The spec. Answer these questions:
• What does the app do in one sentence?
• Who is using it and what is their goal?
• What are the three to five core screens or features?
• What does it NOT do? (Constraints are as important as features)
• What should it look like? Reference an app the AI might know.
Once you have those answers, your first prompt almost writes itself. You are not asking the AI to figure out what you want. You are telling it exactly what to build.
Example first prompt (weak): "Build me a productivity app."
Example first prompt (strong): "Build a task management app for freelancers. It should have a dashboard showing active projects, a simple kanban board with three columns (To Do, In Progress, Done), and a client section where users can log contact details. Design it like Linear, clean, dark mode, minimal. No calendar, no time tracking, no invoicing for now."
That level of specificity is what makes prompt-based coding actually work. The more precise your input, the less cleanup you do on the other end.
Structuring Prompts for Reliable Code Generation
There is a structure that works across every AI coding tool. Once you internalize it, your success rate with first-pass code goes way up.
Every good vibe coding prompt has four parts:
1. Context: What already exists. What tech stack. What the user just did.
2. Task: Exactly what you want the AI to build or change. One thing at a time.
3. Constraints: What to avoid. What not to change. What must stay consistent.
4. Output format: Tell it what you want back, whether that is just the component, the full file, a diff, or a code block.
This is especially important in Cursor, where you are working inside an existing codebase. The more the AI knows about what already exists, the less it will break things that are working.
One more rule: one prompt, one task. Asking the AI to build the auth flow, the dashboard, and the billing page in a single prompt is a recipe for chaos. Ship the auth. Review it. Then move on.
Managing Iteration Cycles With AI
Vibe coding is not a one-shot process. The output from your first prompt is a starting point, not a finished product. What matters is how efficiently you move from that starting point to something you can ship.
Here is the iteration rhythm that works:
• Generate. Run the prompt. See what you get.
• Review quickly. Does it roughly do what you asked? Yes or no.
• Approve or redirect. If yes, move to the next feature. If no, give a focused correction prompt.
• Never accumulate debt. Fix issues before adding more features. Small issues compound fast.
The goal is to keep the codebase clean enough that the AI can still understand it as it grows. A messy codebase is harder for the AI to work with, which means worse outputs and more debugging.
In Lovable, this means committing working states before making big changes. In Cursor, it means keeping your files modular so the AI can reason about one component at a time. Same principle, different tools.
Debugging AI Generated Code
The AI will generate bugs. That is not a failure — that is part of the process. The question is how you debug efficiently without spending three hours on a problem that should take ten minutes.
The fastest debugging loop in vibe coding:
Paste the error message directly into the AI. No paraphrasing. The exact error.
Tell the AI what you expected to happen versus what actually happened.
Ask it to fix only the broken thing, not rewrite the component.
Confirm the fix did not break anything else before moving on.
If something has been broken for more than two or three iteration cycles and the AI keeps making it worse, stop. Revert to the last working state and take a different approach. Fighting the AI in circles is a time sink.
One useful trick: ask the AI to explain what the broken code is supposed to do before it fixes it. This forces it to reason through the logic and often catches the issue before it writes a single line.
Integrating AI Code Into Existing Projects
Starting a project from scratch with an AI tool is one thing. Dropping AI-generated code into something that already exists is a different skill set. This is where Cursor really earns its reputation.
When integrating AI code into an existing project, follow these principles:
• Give the AI context about what already exists. Share the relevant files or components so it understands the codebase structure before generating anything new.
• Be explicit about conventions. If your project uses Tailwind, tell it. If you have a specific component pattern, show it a working example.
• Add one thing at a time. Even if you need ten new features, build and test each one before adding the next.
• Test integration points first. The places where AI-generated code connects to existing code are where things break. Check those first.
The goal is to make the AI feel like it is a collaborator who understands your codebase, not a stranger guessing at structure.
Automating Development Tasks With AI
Once you have a working codebase, the next level of the vibe coding workflow is using AI to automate the repetitive parts of development. This is where serious time savings start stacking up.
Things you can delegate entirely to the AI at this stage:
• Writing tests. Give it a component and ask for unit tests. It is tedious work for humans and easy work for AI.
• Generating boilerplate. CRUD operations, API routes, form validation and anything formulaic.
• Refactoring. Ask it to clean up messy code, extract repeated logic into functions, or improve readability.
• Documentation. Pass it a function and ask for inline comments or a README section. Do not write docs from scratch.
• Data seeding and mock content. For testing and demos, AI can generate realistic placeholder data in seconds.
Every hour you save on automating development tasks is an hour you can spend on the product decisions that actually require human judgment.
Optimizing Your Workflow for Faster Builds
You can follow this entire workflow and still be slow if you have not built some habits around tooling and process. Here is what separates builders who finish products from builders who have twelve half-done projects.
Build a personal prompt library.
Every time you write a prompt that produces exactly what you wanted, save it. After a few projects you will have a library of prompts for auth flows, dashboard layouts, API integrations, and more. You stop reinventing the wheel on every build. Check the Prompt Library section of this site (we are building that resource out specifically for vibe coders).
Pick your tools and stay with them.
Tool-switching is a productivity killer. Lovable, Bolt, Cursor, and v0 all have different strengths, but you get much faster by going deep on one or two than by constantly hopping between all of them. Our take: start with Lovable if you are non-technical and want full-stack apps. Add Cursor when you need to work inside an existing codebase.
Set a build timer.
Serious builders use time-boxing. Give yourself 90 minutes to get a core feature working, then stop. This forces you to prioritize, prevents you from over-engineering, and keeps the momentum going. Vibe coding is fast by design, so use that.
Ship before it is perfect.
The best thing about this ai coding process is that you can always come back and improve it. But you need real user feedback to know what to improve. An imperfect deployed product teaches you more in a day than a month of building in isolation.
Podcasts
[Ep. 22]

[Ep. 004]


This platform was started with a simple idea: to share stories that spark curiosity and inspire conversations. Our team of writers and creators is dedicated to bringing thoughtful and diverse voices together. We hope you find value in every read.
Frances Guerrero
Founder & Editor-in-Chief

FAQS
Welcome to Reado, your go-to source for insights, tips, and stories that inspire curiosity and learning. Our mission is to provide readers with high-quality content across topics like lifestyle, travel, productivity, health, finance, and technology.
We’re passionate about storytelling, creating a space where ideas come alive, curiosity thrives, and readers feel inspired to make informed choices.
How do I draw Frames?
To draw a Frame, click on Layout in the Toolbar, then select Frame. Now, you can click and drag anywhere on the Canvas.
How do I add images?
To add an image, select any Frame, and either double-click on it, or go to the Fill property. In the Fill property, switch to the image icon. Here, you can upload images.
How do I add videos?
To add a video to your site, click the “Insert” button and navigate to the “Media” section. Then, drag and drop a video component onto the Canvas.
Does Framer support XYZ?
To add a video to your site, click the “Insert” button and navigate to the “Media” section. Then, drag and drop a video component onto the Canvas.
Does Framer support XYZ?
To add a video to your site, click the “Insert” button and navigate to the “Media” section. Then, drag and drop a video component onto the Canvas.